Watchguard Firebox Configuration
: A case study:
Today we are going to configure the firewall of a college, in such a
way that
Students should access only certain web sites.
Teachers can access some extra sites.
Point : 1
What we are going to configure can be called as CONTENT FILTERING OR
HTTP PROXY CONFIGURATION.
Point 2 :
There are two kinds of people in the college. 1. Teachers 2. Students.
All of them should have username and password.
These usernames should come under the user-group TEACHER, STUDENT. Then
only you can configure teachers and students differently.
Point 3. All the users(teachers and studuents) must
login before browsing anything. Then only the firewall will know whether
you are a teacher or student.
Point 4: The usernames can be stored using different methods
such as Active Directory, local authentication, Radius, or LDAP.
Imagine, this college is maintaining the user accounts in ACTIVE DIRECTORY
Server. Check here
to know how to install active directory
Point 5: You have to create HTTP Proxy policy for TEACHER
group and STUDENT group separately. and configure these policies to
restrict the access.
Point 6: Whenever a computer in the college tries a
web site, the firewall should check whether this user is authenticated.
If not, he should be redirected to authentication Page. For doing this
job, you have to create another policy.
Policy Manager > Edit > Add > Policies > select 'http proxy'
> click ADD.
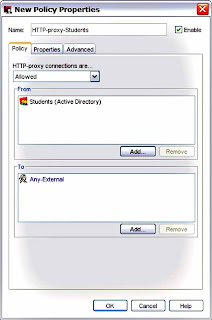
Give the name 'http-proxy-students' to this new policy
Now, Add the user group 'Students' to this policy.
Set the Properties, ie. Restrict the freedom of our students :
1. If the user is idle for more than 10 minutes, he will be automatically
logged out.
2. If the length of the URL is greater than 2048 bytes, then, deny this
request.
3. Select the following categories for blocking : chat, adult, hacking,criminal
activity
Point 6 : Web blocker is another server. Once you are mentioning the
ip address of the web blocker,
the categories in the web blocker is listed here and now you can select
certain categories.
Point 7: In the same way, you can configure the web
blocking for TEACHER group.
Point 8: Let us create the last policy 'http-proxy-redirect'
to redirect the users to login page.
Cut and paste the text below to the Deny Message text box. This contains
XML commands that will automatically redirect users to the authentication
page at https://<your firebox IP address>:4100.
Content-type: text/html; charset="iso-8859-1"
<html>
<META HTTP-EQUIV="Refresh"
CONTENT="15;url=https://?.?.?.?:4100/">
<h3> %(transaction)% denied by WatchGuard HTTP proxy. </h3>
<b> Reason: </b> %(reason)% <br>
<hr size="1" noshade>
<b> Method: </b> %(method)% <br>
<b> Host: </b> %(url-host)% <br>
<b> Path: </b> %(url-path)% <br>
<hr size="1" noshade>
<p>You have not authenticated yet. You will be redirected to the
Firebox
Authentication page in 15 seconds.</p>
<p>To go there immediately, click <a
href="https://?.?.?.?:4100/">here</a>.</p>
</body>
</html>
Edit this text to replace "?.?.?.?" with the IP address of your Firebox.
Click OK to close the Edit HTTP Proxy Action Configuration dialog box.
Click OK to close the New Policy Properties dialog box.
In Policy Manager, select File > Save > To Firebox to save the
configuration changes to the Firebox.
WebBlocker is now configured to use different policies for different
groups of authenticated users, and will automatically redirect unauthenticated
users to the WatchGuard authentication page.
See also
If you choose, you can change the name of the proxy policy. To change
the name, type a new name in the Name text box.
In this example, we call the proxy policy HTTP-proxy-Students.
In the Policy tab, in the From section, click Add to add the user group
for this policy.
In this example, we add the Active Directory group Students.
Select the Properties tab.
Click the View/Edit Proxy icon.
The HTTP Proxy Action Configuration dialog box appears.


